Feeds:
Posts
Comments

Meringue Layered Cake with Whipped Cream and Mixed Berries

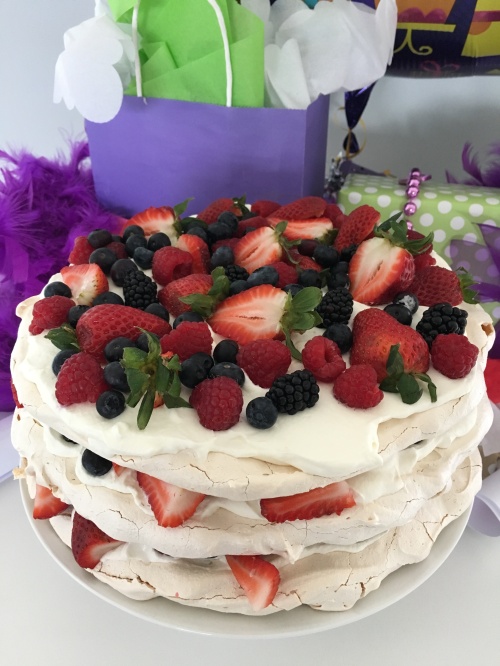
In our Irish home there’s only one type of cake that’s served at birthday celebrations:  meringue. Serve it “traditional-style” and you’re rolling the meringue around a luscious layer of cream and berries…serve it “contemporary-style” and you’re sandwiching mixed berries and cream between layers of crisp meringue. Either way, this cake is always delicious and always a show-stopper.

One point to clarify…for anyone that’s interested…is this: a meringue is not a pavlova. There is a difference. After hotly debating this with someone recently, I did some research. Here are the facts:

A meringue is a simple and pure mixture of whisked egg whites and sugar. A crisp meringue is most usually a French meringue, where the egg whites are whisked and then caster sugar is incorporated. These meringues are baked at a low heat for a long period of time, whereby they are effectively “dried out” rather than “cooked”. A perfect Irish meringue is crisp on the outside, yet not as crisp as a French meringue, and chewy in the middle.

A pavlova, on the other hand, is a type of meringue, especially noted for its marshmallow-like centre. It is made with the addition of cornflour {cornstarch} and, frequently, vinegar.

In our home, meringue cake {roulade or layered} is nearly always made with raspberries, blackberries and strawberries…but it would be glorious with homemade lemon curd or, given the season that’s about to be, homemade wild elderberry curd! In the summer months, I am partial to substituting kiwi, pineapple and bananas for the usual berries…but my family disagree…they always prefer berries to anything else.

Whatever way you make it, I think you’re going to  this recipe!

~ XoK

Meringue Layer Cake

Serves 8

Ingredients

6 large egg whites

12oz sugar {caster}

500ml cream, whipped

1kilo mixed fruit, cut into bite-size pieces

Directions for Making Meringue

1. Preheat oven to 150°C/300°F. Line three baking trays with parchment paper and, using a pencil, draw one circle, 20cm/8-inch, on each piece of parchment paper. {I used a cake tin for this.} Flip the parchment paper over so the pencil circle is facing down towards the baking tray.

2. Beat the egg whites and half the sugar using an electric whisk until soft peaks form. Gradually add the remaining sugar, continuing to whisk until the meringue forms stiff peaks. To test: lift the beater out of the meringue and turn upside down. If the meringue peak holds its shape you are done.

3. Divide the meringue evenly between the three circles and, using an offset spatula, form a circular shape with a smooth top.

4. Bake meringues for 40- 45 minutes, or until dry to the touch. If your oven is not big enough to bake all three meringues at the same time or you don’t have a second oven, make a third of the recipe at a time and bake each layer individually. I have two ovens, so I bake two meringue layers in one and the third layer in the second oven. I keep a close eye on the oven with the two meringues: if they are not cooking evenly, I swap the shelves.

5. When they are done, remove the meringues from oven and cool completely on cooling racks.

Directions for Assembling

1. Very gently lift one meringue layer off of the parchment paper and place on a flat serving plate. Top with one-third the whipped cream, and sprinkle with one-third the fruit.

2. Repeat for second layer.

3. For the top layer, again gently lift the third meringue off of the parchment paper and place on the cake, cover with the last of the whipped cream and the last of the fruit. Serve immediately or refrigerate for up to 2 hours.

Additional Notes, Related Articles & Credit:

* It’s a bit of a needle in a haystack, but it’s so worth it: Darina Allen’a lemon curd recipe here.

** I worship at the feet of Yotam Ottolenghi’s meringues. Here is his devine recipe!


SaveSave

Fresh Basil Pesto Recipe

My kitchen looks like a bomb hit it this morning! For some reason I got up and started baking and cooking with abandon. Truth is, I don’t even mind the mess…it’s been lovely to work away in the kitchen. 😉

When I was rooting through the fridge, pulling out ingredients, I noticed I had a few packets of basil sitting in the crisper. Not wanting them to go to waste, I decided to make homemade basil pesto. Summer is, after all, only just around the corner and this basil recipe is so incredibly delicious over chicken or with pasta or even swirled into soup {especially my Tomato and Irish Whiskey soup}.

This pesto is herby, nutty, and has just the right amount of garlic flavour. It can be whipped up in the same amount of time it takes you to boil a pot of pasta {Can I get a “Mama Mia!?”} and you can double the recipe and put some away in the deep freeze. Enjoy!

~XoK

Fresh Basil Pesto

Makes about 1 cup

Ingredients

44g/2 cups basil leaves

16oz/44g/2-handfuls pine nuts

4g/2-handfuls freshly grated Parmesan cheese

1 clove garlic, peeled

9 tablespoons olive oil

sea salt and pepper to taste

Directions

1. Put the basil, pine nuts, Parmesan and garlic in a food processor or Vitamix {if you like your pesto silky smooth}.

2. Pour over 5 tablespoons olive oil and pulse in the food processor or mix on low in the Vitamix.

3. Drizzle in the remaining 4 tablespoons olive oil.

4. Taste, season with salt and pepper, and add more pine nuts, garlic, or Parmesan until you are happy with the flavour. Add more olive oil if you prefer a runnier consistency.


5. If not using immediately, transfer to an air-tight container and drizzle some olive oil over top or pour into a freezer bag, lay flat in your freezer, and use as needed.

Additional Notes, Related Articles & Credit:

* From the folks over at thekitchn.com, another idea for freezing homemade pesto

** If you’re interested in the history of pesto sauce, you can learn oodles here at thesplendidrecipes.com or here at saveur.com.

*** You can find tips for growing basil in the kitchen at thekitchn.com.


SaveSaveSaveSave

Easy Roast Chicken Recipe

Who doesn’t love a roast chicken…am I right? Crispy, salty skin over tender, juicy meat. The aroma of home cooking wafting through the house. Tasty leftovers to use all week in sandwiches, soups, pastas and more.

Mastering a delicious roast chicken is not an art …it’s really too simple for that…which is one of the many reasons why I call this recipe Lazy Roast Chicken. It’s so easy to make you’re going to feel positively lazy!

This recipe literally takes no effort whatsoever and has only four ingredients…salt and pepper being two of them. You don’t have to lift the skin off the breast for butter or herbs. You don’t have to put a lemon or garlic into its cavity. You don’t have to tie up the legs with twine, tuck the wing tips under the body {which I still haven’t figured out how to do well}, and you don’t even have to baste the darn thing.

All you do is pre-heat the pan, rub the chicken body with olive oil, sprinkle liberally with salt and pepper, pop it into the oven and you’re done. Once it’s in the oven, you are free to dilly dally, goof off, or just hang out.*

Roast Chicken in Oven Proof Frying Pan

And, when it’s done, you’ll notice that the chicken legs are slightly splayed {now doesn’t IT look lazy?}, the crispy skin is a gorgeous caramel colour, and the meat is juicy and delicious. I love to make this dish on a Sunday and use the leftovers in lots of different dishes throughout the week. Enjoy!

~XoK

Lazy Roast Chicken

Serves 4-6

Ingredients

1 fresh whole chicken, approximately 4 pounds, free range or organic if possible

2 tablespoons olive oil

Sea salt and freshly ground pepper

Directions

1. Remove the chicken from the fridge 30 minutes before you want to cook it, to allow it to come up to room temperature.

2. Preheat the oven to 220ºC/450ºF and adjust the oven rack to the middle of the oven. Place a 12-inch oven safe frying pan on the rack and close the oven door.

3. Unwrap the chicken, remove the neck or giblets inside the cavity, if they are there, and pat dry the chicken with kitchen roll.**

4. Drizzle the chicken with olive oil and season well with sea salt and black pepper, then rub it in well over the entire bird with your hands.

5. Carefully, set the chicken in the preheated oven safe frying pan in the oven, breast-side up. Roast 30 minutes and then check that the thickest part of the chicken breast registers 48ºC/120ºF on an instant-read thermometer.

6. Once it does, turn off the oven and leave the chicken in the oven until the breasts register 74ºC/165ºF {about 30 minutes}. If you don’t have a thermometer, a visual clue is that all the juices that come from the chicken should run clear and not be pink.

7. Transfer the chicken to a carving board, cover with aluminium, and allow to rest for 20 minutes. Carve and serve with the juices from the pan.

Additional Notes, Related Articles & Credit:

* {all synonyms for “lazy”!}.

** Here’s a quick Q & A in Poultry Care:

Q. Do I need to rinse my bird when I get it home?

A. The advice not to wash a chickens is longstanding as food safety experts widely agree it raises the risk of spreading dangerous bacteria found on raw poultry all over the kitchen.

Q. Is raw poultry as dangerous as people say?

A. It’s always better to be safe than sorry…so, after working with raw chicken, turkey or other birds, always clean your cutting board, knife, sink, counter, hands or whatever has come in contact with the poultry well with hot soapy water. Then dry it well and, for safe measure, wipe down with a disinfecting wipe.

Q. What are those little white feather bits stuck in the skin and should I remove them?

A. The little “white feather bits” are called “pin feathers” and yes you should remove them. I’ve heard of people using a blow torch to fry the little suckers…but a good pair of kitchen tweezers should do the trick.

*** Supposedly, the purpose of trussing a bird is to keep the splayed legs from burning. But, in all my years of roasting a chicken or a turkey, I have never seen an untrussed chicken or turkey burn or cook unevenly.

**** If your oven has a convection setting, use it. Your oven will be more evenly heated throughout. The drawback is that you’ll need to reduce the temperature stated for the recipe a wee bit. This can take a bit of experimentation, as all ovens are different. If a recipe calls for 220ºC/425ºF, I will typically drop the temperature down to 200ºC/400ºF.

***** Here are two video links to see how the experts check if their chicken is fully cooked without using a digital thermometer: BBCgoodfood.com and Food52.com.

SaveSaveSaveSave

One salmon taco on a bed of lettuce and cucumber

Fish tacos, that great meal of the Baja Peninsula, should really be an Irish “thing” too. We are, after all, surrounded by water and we have some of the most delicious fresh fish available to us year round.

In our Irish home we use salmon to make fish tacos because we really can’t get enough salmon in our diet, but haddock, cod, or any firm white fish would be equally nice. Served on warm tortillas, with a crunchy mixed salad slaw, a bed of cool guacamole, and a good squeeze of lime, these tacos are delicious. They’re also a good way to get someone, who might not normally like fish, to try it.

Screen Shot 2017-09-18 at 10.18.43 PM

And, did you know that Cinco de Mayo is this Saturday? All of the recipes below, double easily, making them a perfect main course to serve a hungry, festive, crowd. So turn up the Latin music, put the cervezas on ice, and enjoy!

~XoK

Roasted Salmon Tacos with Mixed Salad Slaw

Serves 8

Ingredients for the Mixed Salad Slaw

8oz/½-lb mixed lettuce leaves, finely shredded

½ seedless cucumber, unpeeled, halved lengthwise, seeds removed and very thinly sliced

2 sticks of celery, chopped

2oz/59ml/¼-cup good white wine vinegar

salt and freshly ground black pepper, to taste

Directions for the Mixed Salad Slaw

At least an hour before you plan to serve the tacos, toss the lettuce, cucumber, celery, vinegar, 1 teaspoon salt and black pepper together in a large bowl. Cover and refrigerate.

Ingredients for Guacamole

2 ripe avocados

Juice of ½ lime

1 teaspoon finely chopped cilantro or parsley

2 tablespoons Garlicky Marinated Tomatoes or plain cherry tomatoes, chopped

Directions for Guacamole

1. In a small bowl, mash the avocado.  Stir in lime juice.

2. Add the cilantro or parsley and the Garlicky Marinated Tomatoes, stirring until just combined. Do not over stir.

3. Cover with cling film {plastic wrap}, making sure it touches the avocado and refrigerate.

Ingredients for Salmon

453g/16oz/1lb salmon

½ lime, juiced

olive oil

1 teaspoon of chili powder

1 teaspoon cumin,

½ teaspoon garlic powder

salt and pepper to taste

8 tortillas

Directions for Salmon and Tortillas

1. Pre-heat oven to 220°C/425°F/gas mark 7. Place oven rack in the middle of the oven. Line a baking tray with aluminium and top with a sheet of parchment paper.

2. Mix the chili powder, cumin and garlic powder in a small bowl and set aside.

3. Rinse the salmon, pat dry with kitchen roll(paper towel), and, if necessary, remove any bones.

4. Put the salmon fillets on the parchment paper, skin-side down, and squeeze lime juice over.

5. Pour over some olive oil and, with your hands, spread it on all sides of the fish.

6. Dust the fish with the mixed spices. Salt and pepper, as desired.

7. Roast in the oven for approximately 15 minutes or until the salmon is cooked all the way through. Roasting times will vary depending on your oven and the thickness of the salmon.

8. When it’s done, remove the fish from the baking tray and break it apart with a fork.

9. To warm the tortillas, wrap them in moist kitchen roll, pop them into the microwave for 30 seconds to one minute at full power. They should come out beautifully hot.

To Serve

1. Serve the fish on a platter with some lime wedges on the side.

2. Put the tortillas, wrapped in a cloth napkin, on a plate.

3. And bring both the fish and the tortillas to the table with a bowl of the crunchy salad slaw and the guacamole. Let each diner assemble his or her own tacos.

Additional Notes, Related Articles & Credit:

* Irish fish tales from Saveur.com

** If you prefer, you can substitute green and purple cabbage, thinly sliced, for the crunchy mixed salad.

*** If you want to get a jump start on the preparation, make the slaw and the guacamole the night before. If the guacamole turns brown on the top, carefully remove the brown bits and it will be lovely and green underneath.

SaveSaveSaveSave

SaveSaveSaveSave

SaveSave

SaveSave

Oven Roasted Parmesan Brussels Sprouts

I don’t remember eating Brussels sprouts as a child. In fact, it wasn’t until I lived in Ireland, where my mother-in-law served them sautéed in soy sauce, that I first tried them. It was love at first bite!

Now I roast Brussels sprouts all the time. Good enough to be eaten straight from the oven like a snack…these are equally delicious at room temperature. What’s more, despite their diminutive size, Brussels sprouts are high in fibre, vitamins and minerals, they can trigger the liver to produce detoxifying enzymes, they have been shown to reduce blood sugar levels, and they may protect against cancer. One thing to note, if you’re taking a blood thinner like Warfarin, research has shown Brussels sprouts may lessen the drug’s effectiveness due to the Vitamin K in them.

The secret to getting a good carmelisation on the sprouts is roasting them in a single flat layer, making sure they don’t overlap.

And, finally, you can turn these lovely little super foods into an awesome vegetarian meal by tossing  them with arugula and lentils or bulgur wheat.

Roasted Parmesan Brussels Sprouts

Serves 4-5

Ingredients

2lb/906g Brussels sprouts, washed, trimmed and halved length-wise

4 tablespoons olive oil

zest of a small lemon, plus 1 tablespoon of the juice

salt and pepper to taste

freshly grated Parmigiano-Reggiano to taste (optional)

Directions

1. Preheat oven to 220ºC/425ºF and set oven rack into the middle of the oven.

2. Place dry Brussels sprouts on a large baking tray.

3. Add the olive oil, salt and pepper, lemon juice, and grate the lemon zest over the tray {that way you get all the lovely oil from the lemon too} and mix with your hands until the Brussels sprouts are coated.

4. Roast in the oven for 15 minutes ~ the sprouts will begin to caramelize in places. Toss the sprouts and add freshly grated Parmesan to taste.

5. Continue roasting for another 15 minutes until the sprouts are tender.

Additional Notes, Related Articles & Credit:

* To read more about the health benefits of Brussels sprouts, visit Dr. Andrew Weil’s website here.

** A Mayo Clinic online article about Warfarin and foods to avoid may be read here.

*** And, if by chance Brussels sprouts and other cruciferous vegetables give you wind {gas}, you may find this article, also from Dr. Andrew Weil’s website, helpful!


Freshly made Sheet Pan Turmeric Meatballs

When life gets super busy, who has the time or the energy to stand in front of the hob and make dinner? Not me…and I’ll bet…not you either. Which is why I think, after you try this recipe, you’ll agree that these sheet pan meatballs are the bomb! Mix up six ingredients, roll them into little balls {or better yet…get the kids to do it!}, drop them onto a baking sheet, pop them in the oven…fifteen minutes later…you’re done. It really couldn’t be simpler.

In and Irish Home Sheet Pan Turmeric MeatballsReady for the oven: raw sheet pan meatballsFresh from the oven: Sheet Pan Meatballs

If you’re feeling particularly energetic and you want to fry them up…go for it…they’re great that way too. But I’m only going to offer this: when you put them into the oven there’s no grease splattered everywhere to clean up. Uh huh…I see the wheels of your mind clicking over!

These meatballs are delicious doused in a homemade spaghetti sauce {here’s mine}, but you could easily drop the into the kids’ macaroni n’ cheese, line them up in a bread roll with some homemade sriracha mayo, dot a frozen pizza with them, skewer them with cherry tomatoes, tiny mozzarella balls and basil leaves, really there’s just no end to their versatility.

~XoK

Sheet Pan Turmeric Meatballs

Makes 32 one-inch Meatballs

Ingredients

400g organic mince beef

1 free range egg

2 teaspoons ground turmeric

1 teaspoon mixed Italian herbs

2 globes garlic, peeled and crushed

sea salt and freshly ground pepper to taste

olive oil

Directions

1. Heat oven to 200ºC/400ºF and place oven shelf in the middle of the oven.

2. Mix all the ingredients, except for the olive oil, in a medium sized bowl with your hands and form meat into 3cm/1-1/2″ size balls.

3. Lightly coat a baking sheet with olive oil. Add the meatballs to the sheet pan and place in the middle of the oven and bake for 10 to 15 minutes, or until meatballs are cooked through.

Additional Notes, Related Articles & Credit:

* To read up on the health benefits of turmeric, here’s an article from the bbcgoodfood.com website.

** Over at Smittenkitchen.com, Deb Perelman has a recipe for sheet pan meatballs with turmeric chickpeas that also looks yummy.

*** Did you know that in Italy there is no traditional dish there called Spaghetti and Meatballs? Tis true! “Meatballs in general have multiple creation stories all across the world from köttbullars in Sweden to the various köftes in Turkey. Yes, Italy has its version of meatballs called polpettes, but they differ from their American counterpart in multiple ways. They are primarily eaten as a meal itself (plain) or in soups and made with any meat from turkey to fish. Often, they are no bigger in size than golf balls; in the region of Abruzzo, they can be no bigger in size than marbles and called polpettines. But those large meatballs, doused in marinara over spaghetti are 100 percent American. So how did spaghetti and meatballs evolve from polpettes? The answer is similar to every ethnic cuisine that traveled to this country; immigrants had to make do with the ingredients they could find and afford.” To read more, please visit: www.smithsonianmag.com.


fullsizeoutput_6cc4

It may be spring, but there’s still a nip in the air here in Ireland. And on these cold and rainy days, when you’re chilled to the bone, there are few dishes more welcoming than a big bowl of chili.

This vegetarian twist on the classic chili con carne recipe comes from Lisa Leake’s cookbook 100 Days of Real Food. I was given the cookbook a few years ago and only recently started testing recipes from it. I like the book’s premise “simple, family-friendly recipes to help you ditch processed foods and eat better every day”. I’m in complete agreement with Lisa on eating well and eating consciously.

Years ago, after a health scare, I drastically changed my family’s diet. Foods designed to sit on our shelves for months, foods laden with sugar, foods that had no resemblance to what our parents, grandparents and great-grandparents ate were replaced by real foods, products with ingredients lists I could pronounce, foods that nourished our bodies, souls and minds. Friends used to tease me when they’d see me in the aisles at Tesco reading labels, but I never minded…my family’s health and well being were worth it.

And here we are, more than ten years later, and there’s been a seismic shift towards mindful eating…I’m not the only one reading labels anymore!

Lisa’s Leake’s version of vegetarian chili is hearty and delicious. It is a breeze to make and, if you double the recipe, it freezes beautifully. I hope you give this recipe and try…in the meantime… bundle up…it may be spring…but it’s still chilly out there!

~XoK

Vegetable Chili

Serves 4

Ingredients

2 tablespoons olive oil

114g/3/4-cup diced onion

1 bell pepper, any colour, cored, seeded and diced

132g/3/4-cup fresh or frozen corn kernels {no need to defrost frozen corn}

2 cloves garlic, minced

28 ounce can diced tomatoes with juice

15 ounce can kidney beans, drained and rinsed

2 bay leaves

2 teaspoons chili powder

1 teaspoon ground cumin

1 teaspoon salt

1/8 teaspoon cayenne pepper, or to taste

Directions

1. Heat the olive oil in a large saucepan over medium heat.

2. Add the onion and bell pepper and cook until they begin to soften, about 5 minutes

3. Stir in the corn and garlic and sauté for 1 or 2 minutes.

3. Add the tomatoes, beans, bay leaves, and seasonings and bring to a boil. Lower the heat and simmer uncovered for at least 30 minutes and up to 1 hour. The longer it simmers, the better the chili will be.

4. Remove the bay leaves, ladle the chili into bowls, and serve with the desired toppings.

Additional Notes, Related Articles & Credit:

* Toppings might include grated cheddar cheese, sour cream, chopped red onion, diced avocado and/or homemade corn bread. And, if you want to eat chili the way I did growing up, serve it over a bowl of rice.

** My usual go to vegetarian chili recipe is from Elizabeth Buxton and Terence Stamp’s cookbook, The Stamp Collection Cookbook. You can find the recipe here.


Roasted Carrots

This recipe is my favourite way to cook carrots, though it works especially well for beets too. I think it’s the combination of the sweetness of the carrot and the acidity of the white wine vinegar that makes it so moreish. There is no ingredient measuring per say. Everything is done by eyeball and a lick of your fingers! But once the carrots are roasted, they are an absolute joy to eat!

~XoK

Gorgeous Roasted Carrots

Serves 4

Ingredients

2 lbs/900g organic carrots, cut the leafy greens off but leave a little bit for flair

3-4 cloves garlic, peeled and smashed

olive oil, enough to coat the carrots and a little extra for the roasting tin

white wine vinegar, a healthy splash or two, to taste

salt and pepper, to taste

dried Herbs de Provence, to taste

Directions

1. Preheat oven to 220ºC/425ºF.

2. Wash carrots but don’t peel {unless you absolutely feel you must}.*

3. Dry carrots and place on a large baking sheet.

4. Pour over just enough olive oil to coat the carrots without drowning them in oil.

5. Liberally salt and pepper the carrots.

6. Sprinkle with Herbs De Provence to taste.

7. Give the carrots a good splash of vinegar.

8. Add the smashed garlic and give all the ingredients a good toss so that everything is well mixed and coated.

9. {This is a bit naughty here…} Taste your fingers to check for flavouring. Add more salt, pepper, Herbs De Provence and vinegar as needed.

10. Pop the tray into the oven for 20-30 minutes. To test for doneness, push a fork into the side of one of the carrots, if it pushes through easily the carrots are done, if you get some resistance, the carrots are undercooked and continue roasting for another 5 minutes and check and repeat again as needed.

Spring carrots with their greens still onFreshly Washed Carrots Ready for Roasting

Tray of Roasted Carrots

Additional Notes, Related Articles & Credit:

* In our Irish home we do not peel carrots because we buy organic. If you’re buying conventional carrots, I suggest peeling them…though if the peel contains pesticide then doesn’t it make sense that the whole carrot does too?

** According to Prevention.com: “Carrots are rich in compounds called polyacetylenes, and preliminary research is investigating their potential to kill human cancer cells in test tubes. They may have antifungal, antibacterial, and anti-inflammatory effects, too. But these compounds are concentrated just beneath the skin—so either leave your carrot skins on, or go easy with the peeler and remove only a thin strip.”

** Irish food blogger Aoiffe of ICanHasCook.com has a wonderful sounding recipe I’m dying to try: Honey and cumin roasted carrots with toasted couscous and a drizzle of harissa yoghurt.

**** Irishtractor.ie has this interesting article on Irish carrot grower Leo Dunne based in Durrow, Co. Laois…right along the River Nore.

Gur Cake

Traditional Irish Gur Cake

My mother-in-law was a resourceful woman…she had to be raising twelve children in Ireland in the 60’s, 70’s and early 80’s. All her life she lived the adage “waste not want not” and passed it down to her daughters and me before she left this world.

But in all the years Mama taught us to be thrifty at home, especially in the kitchen, she never mentioned Gur Cake…which in hindsight is so strange because she taught us to make fresh pressed apple juice, homemade Irish soda bread, thick and hearty vegetable soup, and so much more.

Gur Cake, also known as Chester Cake, Donkey’s Gudge, and Gudge Cake, depending on what part of Ireland you come from, is a speciality of Irish bakers and has been around since the nineteenth and early twentieth centuries. In recent years, it’s fallen out of favour, having been replaced by muffins, Mars Bars biscuits, custard slices and the like, but it’s still deeply ingrained in the Irish food-psyche.

The ingredients for this cake are as they have always been: stale bits of bread and/or cake mixed with spices, dried fruit, brown sugar, and tea. The filling is rich and delicious and the smell is reminiscent of Christmas.

Gur Cake is a perfect year round treat that is simple to make and a pleasure to eat, especially with a hot cuppa tea. So, the next time you’ve got stale baked goods in your cupboards…don’t throw them out…get thrifty and turn them into something wonderfully Irish. You’ll be glad you did!

~ XoK

Gur Cake

Serves 8-10 Slices

Ingredients

8 level tablespoons/75g/3oz plain flour {self-raising flour}

8 slices of stale bread or cake/350g/12oz {crusts removed from bread and icing removed from cake}

cold water

1 level teaspoon baking powder

1 cup+1 tablespoon/225g/8oz brown sugar

4 tablespoons/50g/2oz butter

2 tablespoons/1 dessertspoon mixed spice {pumpkin spice}

1+1/2cup/254g/9oz raisins

1 large egg {lightly beaten}

2/3 cup/150ml milk

zest of a small orange

2 sheets of shortcrust pastry

Directions

1. Preheat oven to 190°C/375°F. Lightly grease a 22cm {9″ square} baking tin with softened butter, then lightly flour the surface, and set aside.

2. Cover the bread with cold water and allow to stand while making the filling and prepping the pastry.

3. Combine the flour, baking powder, sugar, butter, mixed spice, beaten egg, milk and orange zest. Mix well.

4. Squeeze the bread dry of the water, add it to the flour mixture and stir well.

5. Cut two pieces of shortcrust pastry just big enough to fit inside the baking tin. Line the bottom of the baking tin with one piece of pastry, pour over the fruit mixture and spread it level. Then cover with the second piece of pastry.

6. Prick the top pastry with a fork or score it three or four times across with a knife.

9. Bake for about an hour. Leave in the tin to cool completely. Cut in squares and sprinkle with icing sugar.

Additional Notes, Related Articles & Credit:

* The name “Gur Cake” is said to have come from the Irish slang word “gurrier“, which has been used to describe young lads from the city centre who frequently skip school and are said to “be on the gur“.

** It is said that the gurriers running around the streets of Dublin often had just enough money to buy a fruit slice which, over time, became known as Gur Cake.

*** If you’d like a slice of Gur Cake and don’t want to make it yourself, head into Mannings Bakery in Dublin where they’ve been making it since they first opened in 1945.

**** Recipe based on one found at Odlums.ie


Irish salmon on a bed of quinoa and chopped kale

I’ve been a huge fan of Rory O’Connell for years. Not only did he co-found Ballymaloe Cookery School with his sister Darina Allen in 1983, but he has also worked with Alice Waters at Chez Panisse in California, he was the 2013 Winner of the André Simon Book Award for his book Master It, and he has been the Ambassador of the Year for Good Food Ireland.

Not too long ago, my husband and I took a cookery course at Ballymaloe and were fortunate to have Rory as one of our instructors. He was funny, wickedly talented, and generous with his knowledge. Here are a few photos from the weekend:

Today’s recipe for oven baked salmon in an aluminum parcel with lemon, chili and mint comes straight out of Master It: How to Cook Today. It is easy to make {despite its long-winded name} and tastes great. Of course, as you know, salmon is a hearty fish with a subtle flavour; the chili, lemon and mint in this recipe adds just a tiny bit of zing to this otherwise delicious fish. I recently served it with a side of quinoa, cooked in vegetable stock, mixed with chopped kale. Rory suggests boiled new potatoes and peas, and sometimes a tomato and basil side salad. Any way you chose, I think you’ll find this recipe really makes for a lovely little dinner.

~XoK

Rory O’Connell’s Salmon in a Foil Bag with Lemon, Chili & Mint

Serves 4

Ingredients

80g/5-1/2 tablespoons butter, softened

4 x 150g fillets of salmon, skin removed

Maldon sea salt and freshly ground black pepper

Pinch of chili flakes

Grated zest of 1/2 a lemon

1 tablespoon lemon juice

1 tablespoon mint leaves

4 lemon wedges, to serve

Directions

1. Preheat oven to 200ºC/400°F and put a baking tray in to heat up.

2. Cut a piece of foil about 80cm long and lay it on your worktop. Fold in half from the top down, just to crease the centre line crossways, and open it out again. Rub the lower half of the foil, where the fish will be sitting, with some of the soft butter.

3. Place both pieces of {rinsed and dried} fish on the foil and season with salt and pepper, chili flakes and the lemon zest.

4. Pour the lemon juice over and dot the remaining butter on top of the fish.

5. Fold the top of the foil down and seal the sides with two sharp and definite folds. Seal the mouth of the bag with two more tight folds – there should be plenty of space around the fish inside the bag to allow for steam to build up during cooking.

6. Place the parcel on the heated tray and cook for 15 minutes, by which time the bag should be inflated like a balloon {mine did not inflate but it still cooked perfectly}.

7. While the fish is cooking, coarsely chop the mint leaves. Slash open the bag along the top of the foil and sprinkle the chopped mint all over the fish. Serve immediately, on hot plates with lemon wedges, making sure you spoon the buttery juices over the fish first.

Additional Notes, Related Articles & Credit:

* Here’s a few other delicious salmon recipes from In an Irish Home: Oven Roasted SalmonSalmon Fillets with Pesto and Pecorino,  Salmon Pesto Pasta.

** Burren Smokehouse, just 15 minutes from the Cliffs of Moher, is one of my favourite places to buy smoked Irish salmon.

*** From SpoonUniversity a quirky article: “What You Need to Know About Salmon Skin Before Eating It”.