Feeds:
Posts
Comments

Posts Tagged ‘In an Irish Home Recipes’

Andy Williams may have been singing about Christmas when he crooned It’s the Most Wonderful Time of the Year, but for me, hands down, autumn is the hap-happiest season of all! Back in the day when I was a big-haired, cowboy boot wearing, Texas girl, I used to call this season… “sweater weather”. Back then, I lived for the cooler weekends when I could throw on a pair of well worn jeans, a cozy jumper {sweater} and head off to some grassy field an hour or so outside of Dallas for a bit of antique shopping.

fullsizeoutput_87a2

Now, my life is so different. I’m a wife and mother. We split our time between Ireland and America. And our home is fully furnished {finally!}. I still live for the weekends, but now I’m much more likely to get out for a hike, throw myself on the sofa and relax with a stash of newspapers and magazines or get creative in the kitchen whipping up recipes…{truth be told, a spot of retail therapy in Dundrum also makes the list!}

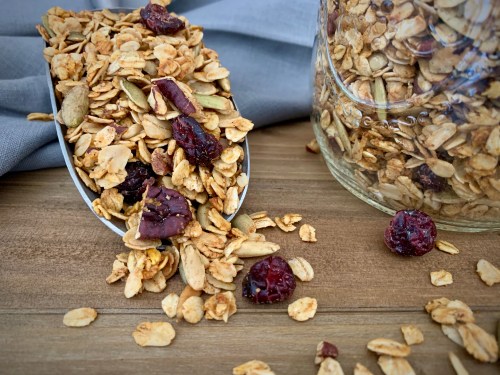
This past Bank Holiday Monday was a perfect day for being in the kitchen. Among other autumn treats, I made Pumpkin Maple Granola, which I double batched because it disappears so quickly. The base recipe is Nadia’s Granola. We love this incredibly more-ish treat but, let’s be honest, it’s nice to change things up every now and again. With that and sweater weather in mind, I created this simple, delicious, Pumpkin Pecan Maple Granola. It takes only 40 minutes to mix and bake and has 11 ingredients: pumpkin pureé, mixed spice, pecans and cranberries…oh my!  And, the smell will drive you around the bend: it’s like a yummy pumpkin spice candle.

fullsizeoutput_87a4

If you prefer to substitute currants or raisins for the cranberries…go for it. Ditto if you want to use a different type of nut…or not nuts at all. This granola doesn’t have any of that over-the-top sugariness that you’ll find in store bought granola. We enjoy it in a multitude of ways: over Weetabix, Special K, yogurt, fresh fruit, ice cream, or by the handful.

fullsizeoutput_87a0

I know the last few days have been cold in Ireland, but I hope you are making time for yourself and your friends/loved ones outdoors in our beautiful countryside. With Halloween less than 24 hours away, be safe, enjoy the candy, carved pumpkins, costumes and bonfires…autumn is truly a magical season.

~ XoK

Pumpkin Pecan Maple Granola

Makes 5 cups/600 grams

Ingredients

50 ml/2oz/¼ cup maple syrup

28g/1oz/¼ cup brown sugar

50 ml/2oz/¼ cup olive oil

½ teaspoon salt

1 teaspoon mixed spice {pumpkin spice}

1 teaspoon vanilla extract

76g/2.7oz/1/3 cup pumpkin pureé

340g/12oz/3 cups rolled oats

118g/4.2oz/1 cup raw pecans, roughly chopped into pieces

130g/4.6oz/1 cup raw pumpkin seeds

50g/1.8 oz/1/3 cup cranberries

Directions

1. Preheat oven to 150°C/300°F.

2. Mix first 7 ingredients in a large bowl.

3. Add oats and mix to coat.

4. Spread mixture out on a large, rimmed, baking sheet. Bake for 25 minutes. Stir every 5 minutes.

5. Add the pecans and pumpkin seeds and bake for another 15 minutes. Continue to stir every 5 minutes.

6. Remove the hot muesli from the oven and allow to cool completely before adding cranberries. Store in a sealed container to keep fresh.

Additional Notes, Related Articles & Credit:

* If you live in Ireland, you can buy Pumpkin pureé year round at Fallon & Byrne.

** Oats are said to reduce harmful LDL cholesterol. To learn more, check-out this article from Mayo Clinic online.

*** Getting outdoors is incredibly healthy for the body, the spirit and the mind. If you’re in Ireland, or visiting soon, check out these articles and websites for places to hike in Ireland. My personal favorites are Glendalough, Killiney Hill, Big Sugarloaf, Bray Head, The Gap of Dunloe, The Giant’s Causeway and the Howth Cliff Walk.

Read Full Post »

fullsizeoutput_877c

It’s been ages since I last posted and a lot has happened in that time. My eldest child, who left for the west coast of America last year to go to university, changed her mind and transferred colleges. My youngest has hit her teen-years like a lioness on the hunt: I’ve been hanging onto her by the tail ever since. My sweet husband continues to do his thing. And I, for my sins, have gotten involved in a side hustle {that’s American speak for side business} that has me up to my eyeballs.

But it’s all good. The new school year has started. Everyone and everything is humming along nicely and I still have my home life in sight…though not always like it used to be. On days like today, when I’ve been working, I’m thankful for the many family-tested-and-approved {the latter being the most important!} recipes I have to hand. These are the ones, like tonight’s supper of lazy roast chicken and pan seared mushrooms, that are super easy to make and absolutely delicious.

Pan seared mushrooms remind me of my mother-in-law. She loved them. Like boiled potatoes, pan seared Brussels Sprouts in soy-sauce glaze, and boiled ham, they were a regular feature at her dining table. Now, they are at mine. I wonder, someday, will they be at my daughters’ table?

Food memories are strong. They’re not just about the dish…they’re about the food and the people and the place and the occasions around them. They can whisk us back to our childhood…or to take us back to a few lovely moments gathered round the table of a woman you whole heartedly admired.

But I digress…these lovely pan seared mushrooms smell amazing. They are good enough to serve at a dinner party. You might even make them as an appetizer for a cocktail get together, with a side of crusty bread to sop up the buttery juices. They would also be perfect on top of a perfectly seared steak, served along a juicy chicken breast, nestled into an omelet or popped into a sandwich bap.

~XoK

Pan Seared Mushrooms

Serves 4

Ingredients

3 tablespoons butter

12 ounces button mushrooms

fresh ground pepper/sea salt to taste

Directions

1. Rinse, dry, and chop mushrooms.

2. Heat butter in a large skillet over medium-high heat until butter begins to bubble.

3. Add mushrooms to the skillet in a single layer and cook, undisturbed, until bottom side is golden brown, about 3 minutes. Toss mushrooms, and continue to cook, reducing heat as needed to avoid scorching, until golden brown all over, about 3-5 minutes more.

4. Season with salt and pepper, to taste, and give the mushrooms a good stir.

5. Remove the mushrooms from the skillet with a slotted spoon and serve immediately.

Additional Notes, Related Articles & Credit:

* Storing mushrooms in the fridge is easy…do nothing to them. I repeat…do nothing to them. Simply remove them from your carry bag and pop them into the fridge. If they come in a shrink wrap package, do not open the plastic…I know…strange for me to say so given how much I detest plastic. But, truly, leave them alone and they will last a week.

** Wash or brush clean? I’ve always rinsed and quickly dried any mushrooms I’ve ever used and done so without problem. To be honest, I couldn’t be bothered brushing each one or peeling each one either. Yes, some people peel their mushrooms!

*** To stem or not to stem? If the mushrooms you purchased have woody stems, discard them just prior to use. Otherwise, keep them and use completely.

**** According to Ireland’s Bord Bia, mushrooms are grown in Ireland in the following counties: Monaghan, Meath, Wexford, Mayo, Kildare, Cavan and Tipperary. Bord Bia’s website also says that mushrooms are a good source of fibre, low in fat, they contain more vegetable protein per 100g than almost any vegetable, and they are richer than most vegetable in some vitamins such as B1 and niacin. Mushrooms also contain certain important minerals such as potassium, phosphorus, iron and copper, and are low in salt.

Read Full Post »

Meringue Layered Cake with Whipped Cream and Mixed Berries

In our Irish home there’s only one type of cake that’s served at birthday celebrations:  meringue. Serve it “traditional-style” and you’re rolling the meringue around a luscious layer of cream and berries…serve it “contemporary-style” and you’re sandwiching mixed berries and cream between layers of crisp meringue. Either way, this cake is always delicious and always a show-stopper.

One point to clarify…for anyone that’s interested…is this: a meringue is not a pavlova. There is a difference. After hotly debating this with someone recently, I did some research. Here are the facts:

A meringue is a simple and pure mixture of whisked egg whites and sugar. A crisp meringue is most usually a French meringue, where the egg whites are whisked and then caster sugar is incorporated. These meringues are baked at a low heat for a long period of time, whereby they are effectively “dried out” rather than “cooked”. A perfect Irish meringue is crisp on the outside, yet not as crisp as a French meringue, and chewy in the middle.

A pavlova, on the other hand, is a type of meringue, especially noted for its marshmallow-like centre. It is made with the addition of cornflour {cornstarch} and, frequently, vinegar.

In our home, meringue cake {roulade or layered} is nearly always made with raspberries, blackberries and strawberries…but it would be glorious with homemade lemon curd or, given the season that’s about to be, homemade wild elderberry curd! In the summer months, I am partial to substituting kiwi, pineapple and bananas for the usual berries…but my family disagree…they always prefer berries to anything else.

Whatever way you make it, I think you’re going to  this recipe!

~ XoK

Meringue Layer Cake

Serves 8

Ingredients

6 large egg whites

12oz sugar {caster}

500ml cream, whipped

1kilo mixed fruit, cut into bite-size pieces

Directions for Making Meringue

1. Preheat oven to 150°C/300°F. Line three baking trays with parchment paper and, using a pencil, draw one circle, 20cm/8-inch, on each piece of parchment paper. {I used a cake tin for this.} Flip the parchment paper over so the pencil circle is facing down towards the baking tray.

2. Beat the egg whites and half the sugar using an electric whisk until soft peaks form. Gradually add the remaining sugar, continuing to whisk until the meringue forms stiff peaks. To test: lift the beater out of the meringue and turn upside down. If the meringue peak holds its shape you are done.

3. Divide the meringue evenly between the three circles and, using an offset spatula, form a circular shape with a smooth top.

4. Bake meringues for 40- 45 minutes, or until dry to the touch. If your oven is not big enough to bake all three meringues at the same time or you don’t have a second oven, make a third of the recipe at a time and bake each layer individually. I have two ovens, so I bake two meringue layers in one and the third layer in the second oven. I keep a close eye on the oven with the two meringues: if they are not cooking evenly, I swap the shelves.

5. When they are done, remove the meringues from oven and cool completely on cooling racks.

Directions for Assembling

1. Very gently lift one meringue layer off of the parchment paper and place on a flat serving plate. Top with one-third the whipped cream, and sprinkle with one-third the fruit.

2. Repeat for second layer.

3. For the top layer, again gently lift the third meringue off of the parchment paper and place on the cake, cover with the last of the whipped cream and the last of the fruit. Serve immediately or refrigerate for up to 2 hours.

Additional Notes, Related Articles & Credit:

* It’s a bit of a needle in a haystack, but it’s so worth it: Darina Allen’a lemon curd recipe here.

** I worship at the feet of Yotam Ottolenghi’s meringues. Here is his devine recipe!


SaveSave

Read Full Post »

Fresh Basil Pesto Recipe

My kitchen looks like a bomb hit it this morning! For some reason I got up and started baking and cooking with abandon. Truth is, I don’t even mind the mess…it’s been lovely to work away in the kitchen. 😉

When I was rooting through the fridge, pulling out ingredients, I noticed I had a few packets of basil sitting in the crisper. Not wanting them to go to waste, I decided to make homemade basil pesto. Summer is, after all, only just around the corner and this basil recipe is so incredibly delicious over chicken or with pasta or even swirled into soup {especially my Tomato and Irish Whiskey soup}.

This pesto is herby, nutty, and has just the right amount of garlic flavour. It can be whipped up in the same amount of time it takes you to boil a pot of pasta {Can I get a “Mama Mia!?”} and you can double the recipe and put some away in the deep freeze. Enjoy!

~XoK

Fresh Basil Pesto

Makes about 1 cup

Ingredients

44g/2 cups basil leaves

16oz/44g/2-handfuls pine nuts

4g/2-handfuls freshly grated Parmesan cheese

1 clove garlic, peeled

9 tablespoons olive oil

sea salt and pepper to taste

Directions

1. Put the basil, pine nuts, Parmesan and garlic in a food processor or Vitamix {if you like your pesto silky smooth}.

2. Pour over 5 tablespoons olive oil and pulse in the food processor or mix on low in the Vitamix.

3. Drizzle in the remaining 4 tablespoons olive oil.

4. Taste, season with salt and pepper, and add more pine nuts, garlic, or Parmesan until you are happy with the flavour. Add more olive oil if you prefer a runnier consistency.


5. If not using immediately, transfer to an air-tight container and drizzle some olive oil over top or pour into a freezer bag, lay flat in your freezer, and use as needed.

Additional Notes, Related Articles & Credit:

* From the folks over at thekitchn.com, another idea for freezing homemade pesto

** If you’re interested in the history of pesto sauce, you can learn oodles here at thesplendidrecipes.com or here at saveur.com.

*** You can find tips for growing basil in the kitchen at thekitchn.com.


SaveSaveSaveSave

Read Full Post »

Oven Roasted Parmesan Brussels Sprouts

I don’t remember eating Brussels sprouts as a child. In fact, it wasn’t until I lived in Ireland, where my mother-in-law served them sautéed in soy sauce, that I first tried them. It was love at first bite!

Now I roast Brussels sprouts all the time. Good enough to be eaten straight from the oven like a snack…these are equally delicious at room temperature. What’s more, despite their diminutive size, Brussels sprouts are high in fibre, vitamins and minerals, they can trigger the liver to produce detoxifying enzymes, they have been shown to reduce blood sugar levels, and they may protect against cancer. One thing to note, if you’re taking a blood thinner like Warfarin, research has shown Brussels sprouts may lessen the drug’s effectiveness due to the Vitamin K in them.

The secret to getting a good carmelisation on the sprouts is roasting them in a single flat layer, making sure they don’t overlap.

And, finally, you can turn these lovely little super foods into an awesome vegetarian meal by tossing  them with arugula and lentils or bulgur wheat.

Roasted Parmesan Brussels Sprouts

Serves 4-5

Ingredients

2lb/906g Brussels sprouts, washed, trimmed and halved length-wise

4 tablespoons olive oil

zest of a small lemon, plus 1 tablespoon of the juice

salt and pepper to taste

freshly grated Parmigiano-Reggiano to taste (optional)

Directions

1. Preheat oven to 220ºC/425ºF and set oven rack into the middle of the oven.

2. Place dry Brussels sprouts on a large baking tray.

3. Add the olive oil, salt and pepper, lemon juice, and grate the lemon zest over the tray {that way you get all the lovely oil from the lemon too} and mix with your hands until the Brussels sprouts are coated.

4. Roast in the oven for 15 minutes ~ the sprouts will begin to caramelize in places. Toss the sprouts and add freshly grated Parmesan to taste.

5. Continue roasting for another 15 minutes until the sprouts are tender.

Additional Notes, Related Articles & Credit:

* To read more about the health benefits of Brussels sprouts, visit Dr. Andrew Weil’s website here.

** A Mayo Clinic online article about Warfarin and foods to avoid may be read here.

*** And, if by chance Brussels sprouts and other cruciferous vegetables give you wind {gas}, you may find this article, also from Dr. Andrew Weil’s website, helpful!


Read Full Post »

Freshly made Sheet Pan Turmeric Meatballs

When life gets super busy, who has the time or the energy to stand in front of the hob and make dinner? Not me…and I’ll bet…not you either. Which is why I think, after you try this recipe, you’ll agree that these sheet pan meatballs are the bomb! Mix up six ingredients, roll them into little balls {or better yet…get the kids to do it!}, drop them onto a baking sheet, pop them in the oven…fifteen minutes later…you’re done. It really couldn’t be simpler.

In and Irish Home Sheet Pan Turmeric MeatballsReady for the oven: raw sheet pan meatballsFresh from the oven: Sheet Pan Meatballs

If you’re feeling particularly energetic and you want to fry them up…go for it…they’re great that way too. But I’m only going to offer this: when you put them into the oven there’s no grease splattered everywhere to clean up. Uh huh…I see the wheels of your mind clicking over!

These meatballs are delicious doused in a homemade spaghetti sauce {here’s mine}, but you could easily drop the into the kids’ macaroni n’ cheese, line them up in a bread roll with some homemade sriracha mayo, dot a frozen pizza with them, skewer them with cherry tomatoes, tiny mozzarella balls and basil leaves, really there’s just no end to their versatility.

~XoK

Sheet Pan Turmeric Meatballs

Makes 32 one-inch Meatballs

Ingredients

400g organic mince beef

1 free range egg

2 teaspoons ground turmeric

1 teaspoon mixed Italian herbs

2 globes garlic, peeled and crushed

sea salt and freshly ground pepper to taste

olive oil

Directions

1. Heat oven to 200ºC/400ºF and place oven shelf in the middle of the oven.

2. Mix all the ingredients, except for the olive oil, in a medium sized bowl with your hands and form meat into 3cm/1-1/2″ size balls.

3. Lightly coat a baking sheet with olive oil. Add the meatballs to the sheet pan and place in the middle of the oven and bake for 10 to 15 minutes, or until meatballs are cooked through.

Additional Notes, Related Articles & Credit:

* To read up on the health benefits of turmeric, here’s an article from the bbcgoodfood.com website.

** Over at Smittenkitchen.com, Deb Perelman has a recipe for sheet pan meatballs with turmeric chickpeas that also looks yummy.

*** Did you know that in Italy there is no traditional dish there called Spaghetti and Meatballs? Tis true! “Meatballs in general have multiple creation stories all across the world from köttbullars in Sweden to the various köftes in Turkey. Yes, Italy has its version of meatballs called polpettes, but they differ from their American counterpart in multiple ways. They are primarily eaten as a meal itself (plain) or in soups and made with any meat from turkey to fish. Often, they are no bigger in size than golf balls; in the region of Abruzzo, they can be no bigger in size than marbles and called polpettines. But those large meatballs, doused in marinara over spaghetti are 100 percent American. So how did spaghetti and meatballs evolve from polpettes? The answer is similar to every ethnic cuisine that traveled to this country; immigrants had to make do with the ingredients they could find and afford.” To read more, please visit: www.smithsonianmag.com.


Read Full Post »

fullsizeoutput_6cc4

It may be spring, but there’s still a nip in the air here in Ireland. And on these cold and rainy days, when you’re chilled to the bone, there are few dishes more welcoming than a big bowl of chili.

This vegetarian twist on the classic chili con carne recipe comes from Lisa Leake’s cookbook 100 Days of Real Food. I was given the cookbook a few years ago and only recently started testing recipes from it. I like the book’s premise “simple, family-friendly recipes to help you ditch processed foods and eat better every day”. I’m in complete agreement with Lisa on eating well and eating consciously.

Years ago, after a health scare, I drastically changed my family’s diet. Foods designed to sit on our shelves for months, foods laden with sugar, foods that had no resemblance to what our parents, grandparents and great-grandparents ate were replaced by real foods, products with ingredients lists I could pronounce, foods that nourished our bodies, souls and minds. Friends used to tease me when they’d see me in the aisles at Tesco reading labels, but I never minded…my family’s health and well being were worth it.

And here we are, more than ten years later, and there’s been a seismic shift towards mindful eating…I’m not the only one reading labels anymore!

Lisa’s Leake’s version of vegetarian chili is hearty and delicious. It is a breeze to make and, if you double the recipe, it freezes beautifully. I hope you give this recipe and try…in the meantime… bundle up…it may be spring…but it’s still chilly out there!

~XoK

Vegetable Chili

Serves 4

Ingredients

2 tablespoons olive oil

114g/3/4-cup diced onion

1 bell pepper, any colour, cored, seeded and diced

132g/3/4-cup fresh or frozen corn kernels {no need to defrost frozen corn}

2 cloves garlic, minced

28 ounce can diced tomatoes with juice

15 ounce can kidney beans, drained and rinsed

2 bay leaves

2 teaspoons chili powder

1 teaspoon ground cumin

1 teaspoon salt

1/8 teaspoon cayenne pepper, or to taste

Directions

1. Heat the olive oil in a large saucepan over medium heat.

2. Add the onion and bell pepper and cook until they begin to soften, about 5 minutes

3. Stir in the corn and garlic and sauté for 1 or 2 minutes.

3. Add the tomatoes, beans, bay leaves, and seasonings and bring to a boil. Lower the heat and simmer uncovered for at least 30 minutes and up to 1 hour. The longer it simmers, the better the chili will be.

4. Remove the bay leaves, ladle the chili into bowls, and serve with the desired toppings.

Additional Notes, Related Articles & Credit:

* Toppings might include grated cheddar cheese, sour cream, chopped red onion, diced avocado and/or homemade corn bread. And, if you want to eat chili the way I did growing up, serve it over a bowl of rice.

** My usual go to vegetarian chili recipe is from Elizabeth Buxton and Terence Stamp’s cookbook, The Stamp Collection Cookbook. You can find the recipe here.


Read Full Post »

Traditional Irish Gur Cake

My mother-in-law was a resourceful woman…she had to be raising twelve children in Ireland in the 60’s, 70’s and early 80’s. All her life she lived the adage “waste not want not” and passed it down to her daughters and me before she left this world.

But in all the years Mama taught us to be thrifty at home, especially in the kitchen, she never mentioned Gur Cake…which in hindsight is so strange because she taught us to make fresh pressed apple juice, homemade Irish soda bread, thick and hearty vegetable soup, and so much more.

Gur Cake, also known as Chester Cake, Donkey’s Gudge, and Gudge Cake, depending on what part of Ireland you come from, is a speciality of Irish bakers and has been around since the nineteenth and early twentieth centuries. In recent years, it’s fallen out of favour, having been replaced by muffins, Mars Bars biscuits, custard slices and the like, but it’s still deeply ingrained in the Irish food-psyche.

The ingredients for this cake are as they have always been: stale bits of bread and/or cake mixed with spices, dried fruit, brown sugar, and tea. The filling is rich and delicious and the smell is reminiscent of Christmas.

Gur Cake is a perfect year round treat that is simple to make and a pleasure to eat, especially with a hot cuppa tea. So, the next time you’ve got stale baked goods in your cupboards…don’t throw them out…get thrifty and turn them into something wonderfully Irish. You’ll be glad you did!

~ XoK

Gur Cake

Serves 8-10 Slices

Ingredients

8 level tablespoons/75g/3oz plain flour {self-raising flour}

8 slices of stale bread or cake/350g/12oz {crusts removed from bread and icing removed from cake}

cold water

1 level teaspoon baking powder

1 cup+1 tablespoon/225g/8oz brown sugar

4 tablespoons/50g/2oz butter

2 tablespoons/1 dessertspoon mixed spice {pumpkin spice}

1+1/2cup/254g/9oz raisins

1 large egg {lightly beaten}

2/3 cup/150ml milk

zest of a small orange

2 sheets of shortcrust pastry

Directions

1. Preheat oven to 190°C/375°F. Lightly grease a 22cm {9″ square} baking tin with softened butter, then lightly flour the surface, and set aside.

2. Cover the bread with cold water and allow to stand while making the filling and prepping the pastry.

3. Combine the flour, baking powder, sugar, butter, mixed spice, beaten egg, milk and orange zest. Mix well.

4. Squeeze the bread dry of the water, add it to the flour mixture and stir well.

5. Cut two pieces of shortcrust pastry just big enough to fit inside the baking tin. Line the bottom of the baking tin with one piece of pastry, pour over the fruit mixture and spread it level. Then cover with the second piece of pastry.

6. Prick the top pastry with a fork or score it three or four times across with a knife.

9. Bake for about an hour. Leave in the tin to cool completely. Cut in squares and sprinkle with icing sugar.

Additional Notes, Related Articles & Credit:

* The name “Gur Cake” is said to have come from the Irish slang word “gurrier“, which has been used to describe young lads from the city centre who frequently skip school and are said to “be on the gur“.

** It is said that the gurriers running around the streets of Dublin often had just enough money to buy a fruit slice which, over time, became known as Gur Cake.

*** If you’d like a slice of Gur Cake and don’t want to make it yourself, head into Mannings Bakery in Dublin where they’ve been making it since they first opened in 1945.

**** Recipe based on one found at Odlums.ie


Read Full Post »

Irish salmon on a bed of quinoa and chopped kale

I’ve been a huge fan of Rory O’Connell for years. Not only did he co-found Ballymaloe Cookery School with his sister Darina Allen in 1983, but he has also worked with Alice Waters at Chez Panisse in California, he was the 2013 Winner of the André Simon Book Award for his book Master It, and he has been the Ambassador of the Year for Good Food Ireland.

Not too long ago, my husband and I took a cookery course at Ballymaloe and were fortunate to have Rory as one of our instructors. He was funny, wickedly talented, and generous with his knowledge. Here are a few photos from the weekend:

Today’s recipe for oven baked salmon in an aluminum parcel with lemon, chili and mint comes straight out of Master It: How to Cook Today. It is easy to make {despite its long-winded name} and tastes great. Of course, as you know, salmon is a hearty fish with a subtle flavour; the chili, lemon and mint in this recipe adds just a tiny bit of zing to this otherwise delicious fish. I recently served it with a side of quinoa, cooked in vegetable stock, mixed with chopped kale. Rory suggests boiled new potatoes and peas, and sometimes a tomato and basil side salad. Any way you chose, I think you’ll find this recipe really makes for a lovely little dinner.

~XoK

Rory O’Connell’s Salmon in a Foil Bag with Lemon, Chili & Mint

Serves 4

Ingredients

80g/5-1/2 tablespoons butter, softened

4 x 150g fillets of salmon, skin removed

Maldon sea salt and freshly ground black pepper

Pinch of chili flakes

Grated zest of 1/2 a lemon

1 tablespoon lemon juice

1 tablespoon mint leaves

4 lemon wedges, to serve

Directions

1. Preheat oven to 200ºC/400°F and put a baking tray in to heat up.

2. Cut a piece of foil about 80cm long and lay it on your worktop. Fold in half from the top down, just to crease the centre line crossways, and open it out again. Rub the lower half of the foil, where the fish will be sitting, with some of the soft butter.

3. Place both pieces of {rinsed and dried} fish on the foil and season with salt and pepper, chili flakes and the lemon zest.

4. Pour the lemon juice over and dot the remaining butter on top of the fish.

5. Fold the top of the foil down and seal the sides with two sharp and definite folds. Seal the mouth of the bag with two more tight folds – there should be plenty of space around the fish inside the bag to allow for steam to build up during cooking.

6. Place the parcel on the heated tray and cook for 15 minutes, by which time the bag should be inflated like a balloon {mine did not inflate but it still cooked perfectly}.

7. While the fish is cooking, coarsely chop the mint leaves. Slash open the bag along the top of the foil and sprinkle the chopped mint all over the fish. Serve immediately, on hot plates with lemon wedges, making sure you spoon the buttery juices over the fish first.

Additional Notes, Related Articles & Credit:

* Here’s a few other delicious salmon recipes from In an Irish Home: Oven Roasted SalmonSalmon Fillets with Pesto and Pecorino,  Salmon Pesto Pasta.

** Burren Smokehouse, just 15 minutes from the Cliffs of Moher, is one of my favourite places to buy smoked Irish salmon.

*** From SpoonUniversity a quirky article: “What You Need to Know About Salmon Skin Before Eating It”.


Read Full Post »

Slice of ham and cheese frittata on a white plate

We love leftovers the first night after Christmas. By the second night, however, we are ready for something different. But, what about all that wonderful leftover turkey and ham that’s sitting in the fridge…right?

“Waste not want not” is a philosophy my mother-in-law Mary Rose taught me well, which is why the second night after Christmas, I usually make a ham and cheese frittata. {For your leftover turkey…why not try this Turkey Shepherd’s Pie?}

This recipe is incredibly quick to make and is, of course, delicious. It’s perfect for a morning meal, Saint Stephen’s Day perhaps, and also makes an ideal brunch main course. At a different time of year, say a beautiful summer’s day, this could easily be packed into a picnic basket too. Enjoy!

Ham & Cheese Frittata

Serves 6

Ingredients

2 tablespoons olive oil

½ onion, sliced

8 eggs

2oz/¼ cup milk

½ teaspoon salt

½ teaspoon pepper

12oz/168g/2 cups ham, diced

3oz/88g/1 cup shredded cheddar cheese

Directions

1.) Preheat oven to 180°C/350°F.

2.) Heat olive oil in a 10” oven proof skillet over moderately high heat. With a pastry brush, spread the olive oil to the sides of the skillet.

3.)Add the onion and sauté until translucent.

4.) While the onions are sautéing, whisk the eggs, milk, salt, and pepper in a bowl. Set aside.

5.) Once the onions are translucent, remove from the heat and spread the diced ham evenly over them.

6.) Pour the egg mixture into the skillet.

7.) Sprinkle the cheese over the top.

8.) Place the skillet into the oven and cook for 30 minutes or until the eggs are fully cooked and the cheese is bubbling. Serve immediately.

Additional Notes, Related Articles & Credits:

* Want to know the difference between a frittata and an omelet? Check out this article from the good folks over at thekitchn.com.

** Here are a few Irish frittata recipes from the world of WordPress bloggers: Irish Breakfast Frittata from The Way I Make It Is; Feta Cheese and Red Onion Frittata from the Irish cookery school known as Cook’s Academy; Bacon Spinach and Potato Frittata from Irish writer Shiela Kiely at Gimme the Recipe; and, finally, a Courgette and Thyme Frittata from Irish food writer Catherine Fulvio.

*** Not into frittatas? Can I tempt you with this amazing Tomato & Almond Tart a la Ottolenghi?


Read Full Post »

Older Posts »