Feeds:
Posts
Comments

Two jars of overnight oats topped with yogurt and blueberriesOvernight porridge {oatmeal} is a familiar thing in our Irish home. To make, I bring a pot of steel cut oats, covered in water, to the boil and then turn off the heat and leave overnight. In the morning, I add a little extra water to the oats, give them a quick stir and reheat. This recipe couldn’t be simpler to make.

But, as my children have gotten older, it has become harder to get them to eat breakfast before they head off to school. So, our beloved hot porridge oats have gone by the wayside and in their place I’ve started making a different kind of overnight porridge: the no-cook kind.

And, you know what? My kids love it. They can grab and go straight from the fridge at home, saving them pocket money, and they can eat their brekkie when they are hungry…not when I want them to eat. The morning argument of “breakfast is the most important meal of the day” is gone and I am thrilled.

A close up of a spoon of overnight oats with two jars filled with overnight oats in the background

This recipe is a win-win for everyone. Once you try it, I know you’re going to like it for your kids too. In fact, make an extra one for yourself…it’s just that good!
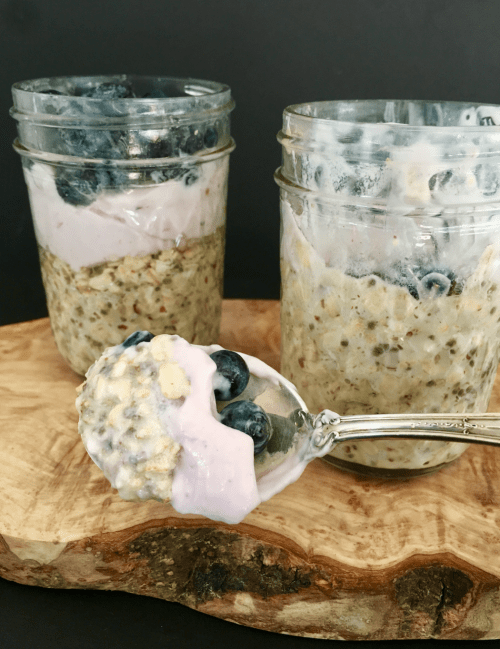
 

Overnight Oatmeal

Makes One

Ingredients

40g rolled oats, not steel cut or instant

75ml milk/almond milk

1 teaspoon vanilla

1 teaspoon honey

1 teaspoon flax seed and/or chia seeds

a pinch of salt

2-3 tablespoons yogurt

fruit to top

Directions

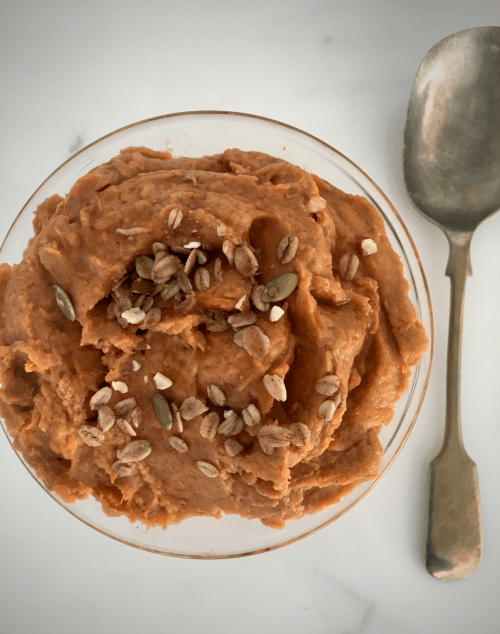
1. Combine the oats, milk, vanilla, honey, salt and flax and/or chia seeds in a glass container and mix well.

2. Top with yogurt and fruit and put the lid on the container.

3. Refrigerate overnight.

Additional Notes, Related Articles & Credit:

* Overnight oats don’t need to be eaten the next morning: they’re good for about three days after you make them. Just know, however, that the porridge will get soggier the longer you leave it. And, if you are going to leave it a few days, don’t add the yogurt or fruit when you make this recipe…add just before you eat it.

** The beauty of this recipe is it can be changed up pretty much however you like. For example, you can add pumpkin seeds or any other kind of seed you like. You can add other stuff like chopped nuts, shredded coconut, cocoa nibs, or dried fruit. How about a pinch of cinnamon or cardamom or stir in some cocoa powder or matcha powder? You could change up the sweetener and add maple syrup, agave, date sugar, brown sugar, or even white sugar, A small squeeze of lemon juice would add a tang to your oats too. The options are endless.

*** For an easy-to-make, and delicious, recipe for traditional Irish steel cut porridge, please click here.


Wishes from In an Irish Home to You and Yours

I have so much to be thankful for today and every day: my sweet family {the inlaws and the outlaws!}, wonderful, supportive, friends, and you…the fabulous visitors who call-in to this blog every day!

From the bottom to the top of my Irish heart…THANK YOU!

Thank you for visiting In an Irish Home, for leaving your comments, and for sharing what you like with me and others.
Wishing you and those you love a blessed Thanksgiving Day!


A bowl of homemade sweet potato casserole, topped with granola and maple syrup

With more than twenty years worth of cooking under my apron, I’m always trying something new in the kitchen…but not when it comes to this sweet potato casserole. This incredibly “more-ish” recipe has been handed down three generations, from mother to daughter, and is perfect just the way it is.

What’s more? This recipe is easy to make, much simpler than Irish mashed potatoes, for example, and it freezes well. This really is the ultimate side dish for your holiday meal. Enjoy!


Sweet Potato Casserole

Serves 4

Ingredients

2 lbs sweet potatoes

60g/4 tablespoons butter

2oz/1/2 cup brown sugar

2 teaspoons cinnamon

2 tablespoons heavy whipping cream

Directions

1. Scrub the sweet potatoes well.

2. Place them in a large saucepan and add cold water until the potatoes are covered by 1-inch. Bring to the boil over high heat. Reduce to simmer and cook for 30 minutes or until a knife tip or skewer goes into the sweet potatoes easily.

2. Drain the sweet potatoes into a colander and peel immediately with a pairing knife while they are still hot {use a clean tea towel to protect your fingers, if necessary}.

3. While you are peeling the potatoes, put the butter into a saucepan and melt.

4. Place the peeled potatoes into a large bowl and mash. Next, add the brown sugar, cream, cinnamon and butter. Stir well. Taste and adjust seasoning as desired.

Additional Notes, Related Articles & Credit:

* To freeze, let the sweet potato cool completely, transfer to a freezer bag, remove any excess air, and store until needed.

** If you want to add a little crunch and saltiness to this dish, top it with my homemade granola {sans raisins}. And maybe add a little maple syrup too!

*** Curious to know the difference between a sweet potato and a yam? Here’s the answer from epicurious.com.


A large bowl of Irish mashed potatoes for Thanksgiving and Christmas

Today we’re making mashed potatoes in our Irish home. And not just any mash either. We’re making velvety, creamy, delicious mashed potatoes. The kind with just the right amount of butter and milk {or cream} and salt added in. The kind that makes you go back to the table for seconds, even when you’re full.

As well as being a seriously homey comfort food, this Master Recipe, forms the base of other well known Irish potato dishes like Colcannon and Champ. It can also be turned into tasty potato cakes with the addition of some grated cheese, herbs, and rashers {bacon}. When topped with smoked salmon or a poached egg, potato cakes make an ideal brunch or light supper.

This recipe freezes well too. Which means you can double batch it for Thanksgiving and reheat it for Christmas {which is exactly what we’re doing today}. To freeze, let the mashed potato cool completely, transfer to a freezer bag, and store until needed. Easy-peasy. If you prefer individual servings, you can scoop out tea-cup-portions of the cooled mashed potatoes onto a Silpat-lined baking sheet and place in the freezer overnight or until the potatoes are completely frozen. Then put the individual servings into a freezer bag and store in the freezer.

To re-heat frozen mashed potatoes, simple chose the method that works best for you: microwave, stove top, oven or slow cooker.

Velvety Irish Mashed Potatoes

Serves 4

Ingredients

1 kilogram/2lbs unpeeled potatoes, preferably Golden Wonders or Kerr’s Pinks in Ireland or Russet or Yukon Gold in America

250ml/8oz/1 cup milk and/or cream {or mix half-and-half}

112g/8 tablespoons butter

salt and pepper

Directions

1. Scrub the potatoes well.

2. Place them in a large saucepan and add cold water until the potatoes are covered by 1-inch. Add a big pinch of salt to the water and bring to the boil over high heat.

3. Boil for 15 minutes, reduce the heat to medium-low, pour off about half the water, add a lid to the saucepan, and let the potatoes steam for another 20-30 minutes or until a knife tip or skewer goes into the potatoes easily.

4. Drain the potatoes in a colander and peel immediately with a pairing knife while they are still hot {use a clean tea towel to protect your fingers, if necessary}.

5. While you are peeling the potatoes, put the milk and butter into a saucepan and bring to a gentle boil.

5. Place the peeled potatoes into a large bowl and mash by hand or use a potato ricer for quicker results.

6. Pour half the hot milk and butter into the potatoes and stir well. Add more milk and butter until you get the smooth potato consistency you prefer. {You may not need all that you have prepared or you might need a little more, depending on how dry the potatoes are}.

7. Season with salt and pepper. Taste. Correct the season as you like and serve.

Additional Notes, Related Articles & Credit:

* You may, of course, peel the potatoes before you boil them, but leaving the skins on during the boiling process gives the mashed potato an lovely flavour.

** Using a potato ricer or food mill will give your mashed potatoes a smoother, creamier, texture than mashing with a potato masher. Darina and Rachel Allen, of Ballymaloe, recommend placing them in an electric food mixer using the paddle attachment to mash them.

*** Never use a blender or food processor to whip your potatoes: you’ll be left with a gluey mess if you do.

**** If you have a composter, throw the peeled potato skins into it to help feed next year’s garden bounty.


Chicken Legs with Sweet Tomatoes in a big pot

In a world of fake news…it’s hard to know the truth. So it is with some skepticism that I write today that Jamie Oliver may be retiring. For years, Britain’s cheeky, yet charming, celebrity chef has been talking about wanting to spend more time with his wife and five children. Thus far, however, he’s continued turning out fabulous cookbooks and good tv shows, all the while teaching the world to eat more healthily and mindfully.

I have been a big fan of Jamie Oliver for years, partly because I love his ease with food and recipes and also…strange as it may seem…because he reminds me of my younger brother. Both men are kind-hearted, popular with women, great with kids, teachers of many, and they love to cook. Funny enough…about a year before Jamie Oliver made it big, I said to my little brother…”you should write a cookbook for guys…with all your talk of a handful of this, a bunch of that…you don’t measure anything…you cook from the heart”. Who knew this laid back style of cooking would take the world by storm?

Anyway, if the news is true, I doubt he’ll be gone from the spotlight for long. At 42, Jamie’s got a lot of years ahead of him to share his genius.

Speaking of genius…today’s blog post for Tender & Crisp Chicken Legs with Sweet Tomatoes is quite simply…amazing. It has been one of my go-to dishes for the longest time. What makes it such a star is how you literally, in Jamie’s words, chuck everything into a pot and whack it into the oven. Then you can go and do something for 90 minutes and when it’s done you’ll have a feast to feed the family.

This dish is so good, it doesn’t need tweaking and it is so beautiful that you’ll be proud to present it at a dinner party along side a crusty loaf of bread and a big garden salad. Some might say this is a summer-time dish, but I think it’s perfect on these cold, dark, winter nights. Enjoy!

Jamie Oliver’s Tender & Crisp Chicken Legs with Sweet Tomatoes

Serves 4

Ingredients

higher-welfare chicken legs, jointed

sea salt

freshly ground black pepper

big bunch fresh basil, leaves picked, stalks finely chopped

big handfuls red and yellow cherry tomatoes and ripe plum or beefsteak tomatoes, cherry tomatoes halved, plum tomatoes quartered

whole bulb garlic, broken into cloves

fresh red chile, finely chopped {I use a pinch of dried chile flakes}

Olive oil

One 14.5-ounce/410g tinned cannelini beans, drained and rinsed, optional

handfuls new potatoes, scrubbed, optional

Directions

1. Heat your oven to 180°C/350°F/gas mark 4. Season your chicken pieces all over and put them into a snug-fitting pan in one layer.

2. Throw in all the basil leaves and stalks, then chuck in your tomatoes.

3. Scatter the garlic cloves into the pan with the chopped chile and drizzle over some olive oil. Mix around a bit, pushing the tomatoes underneath.

4. Place in the oven for 1½ hours, turning any of the exposed tomatoes halfway through, until the chicken skin is crisp and the meat falls off the bone.

5. If you fancy, you can add some drained cannelini beans or some sliced new potatoes to the pan and cook them with the chicken. Or you can serve the chicken with some simple mashed potato. Squeeze the garlic out of the skins before serving. You could even make it part of a pasta dish – remove the chicken meat from the bone and shred it, then toss into a bowl of linguini or spaghetti and serve at once.

Additional Notes, Related Articles & Credit:

* For another delicious, easy to make, chicken dish…please see my friend Linda McCaffrey’s gorgeous chicken casserole. It’s another one pot dish I think you’ll love.


Screen Shot 2017-11-13 at 7.06.27 PM

The holidays are right around the corner: Thanksgiving is less than two weeks away and Christmas is just six weeks later. As is the case for so many homemakers everywhere, my holiday countdown has begun!

First up on my To Do list is make candied mix peel. Mixed peel is a staple of Irish holiday baking: it is added to Christmas Cake, Plum Pudding, and is often given as a beautiful homemade gift.

If you have ever tasted store bought mix peel, I want you to forget everything you thought you ever knew about this holiday ingredient. Mixed peel from a plastic tub is bland and unappealing. It’s also loaded with horrid ingredients. Homemade candied mix peel, on the other hand, is brightly coloured, sparkling in sugar crystals, and tastes wonderfully citrusy.


Another bonus of making your own mixed peel is that it’s something you can involve your kids or grandkids in. And, don’t we all want to share time with the young people in our lives? Little-littles and teens can be involved in every stage: selecting the fruit, washing it, juicing and peeling it, cutting it {with your help}, boiling it and, finally, sugaring it.

Wishing you well as you begin your own holiday countdown! And, in all the hassle and bustle, do remember…this is the perfect season for memory making and reviving family rituals. Enjoy!

Citrus Mixed Peel

Makes 4 cups

Ingredients

2 grapefruits, preferably organic

3 oranges, preferably organic

4 lemons, preferably organic

8oz/2 cups sugar

8oz/250ml/1 cup sugar

Directions

1 Cut each citrus in half and juice. Reserve the juice for another purpose and do not use a squeeze juicer as it will damage the peel.

2. Cut each citrus into quarters and, using a paring knife, carefully pull out the inside pith and membrane.

3. Slice the citrus quarters into 1/4-inch-wide strips.

4. Put the citrus strips into a heavy saucepan and add enough water to cover them. Bring to a boil over high heat and blanch for 5 minutes.

5. Drain and repeat Step 4 two more times.

6. While the citrus peels are draining the third time, put the sugar and water into the heavy saucepan and bring to a boil, stir to dissolve the sugar.

7. When the sugar is dissolved, add the citrus peel and boil gently for 30 minutes. Stir occasionally to ensure the peels do not burn.

8. Remove the peel with a slotted spoon and leave to cool for about 30 minutes. Reserve the syrup for another use, perhaps a flavouring for ice tea. Set a rack over a parchment-lined rimmed baking sheet.

9. Put the peel into a clean bowl and pour over 1 cup sugar and mix well. Spread the sugared peel on the wire rack and leave to dry.  The drying process can take 2, maybe even 3, days.

10. Once fully dry, store candied mix peel in an airtight container in a cool, dry place for up to 1 month.

Additional Notes, Related Articles & Credit:

* Since most pesticide residue is found in the skin, its important to use organic fruit when making candied peel.

** Click here for my favourite homemade mince pie recipe.

*** And if you’re looking for homemade Irish recipes for giving at Christmas, please see my post here.


SaveSaveSaveSave

SaveSave

Peek

With our eldest off to college next year, our little Irish family decided to squeeze in as much traveling as we could over the summer. One of our destinations was South Africa.

South Africa is an amazing country…rich and long in history.

While in Cape Town, we took a boat ride out to the notorious Robben Island. It was there that Nelson Mandela spent 18 of his 27 years incarcerated. Here is a peek into his tiny cell.

Nelson Mandela's prison cell, looking through a key hole.

Additional Notes, Related Articles & Credit:
* Word Press Weekly Photo Challenge: Peek
* Nelson Mandela Biography

SaveSave

Yellow and red cherry tomatoes with basil and garlic and olive oil served on a dark grey dish

This recipe started out as a traditional oven roasted tomato dish…one I’ve made a million times. But then, something wonderful and unexpected happened.

The afternoon light began to fade: there was no way to get the tomatoes roasted in time to be photographed, so I wrapped them up and left them on the counter overnight.

yellow and red tomatoes with garlic, basil and olive oil in a baking dish

The next morning, after removing the cling film {plastic wrap}, a cheeky red tomato beckoned me with its lusciousness. Unable to resist, I popped it into my mouth and that’s when I knew…THERE WAS NO WAY THEY WERE GOING INTO THE OVEN!

The tomatoes were sweet and salty and garlicky. I could not stop eating them. In a flash,  I imagined the many ways they could be used {bruschetta, pasta, couscous, salad, grilled chicken, omelet}: so many ways! Then the kids came into the kitchen and they started to nibble on them too. I’ve since made this dish {can it be called a dish?} several times and just poured them into a jar and left them in the fridge. They’ve never lasted long!

Aren’t you thankful when something wonderful and unexpected happens? What dish have you accidentally created…do tell!

Garlicky Marinated Tomatoes

One jar

Ingredients

1 dry pint cherry tomatoes, red and yellow, washed, stems removed, the larger ones cut in half

2 large leaves of basil, rinsed, dried, and finely chopped

2 cloves of garlic, peeled and sliced thinly

olive oil

dried Italian herbs, to taste

salt and pepper to taste

Directions

1. Place the cherry tomatoes in a flat glass or ceramic baking dish that leaves a little room all around {but not too much room}.

2. Add the garlic, basil, and Italian herbs.

3. Add a few good lugs of olive oil. {this isn’t an exact recipe…I know…you don’t want the ingredients swimming in oil, but you do want a nice thin pool in the bottom of the dish}

4. Add salt and pepper to taste and mix well.

5. Wrap the baking dish with cling film {plastic wrap} and leave on the counter overnight to marinate.

6. The next day, unwrap and pout everything into a glass container, with a tight fitting lid, and refrigerate.

Additional Notes, Related Articles & Credit:

* Weck jars…so cute!

** Just used these tomatoes in our omelets this morning. One word: delicious!

*** Eating tomatoes is a good thing: here’s 10 reasons from webmd.com, why we should all be eating tomatoes.

**** Growing basil is a doddle: here’s a post on how to do it from thekitchn.com.

***** If you like tomatoes, this Tomato and Almond Tart from Yotam Ottolenghi is out of this world good.


Fresh Apple Cake in a loaf pan with a pot of Irish Whiskey Caramel Sauce

Oíche shamhna, Dear Readers! A very happy Halloween to you indeed. We’re feeling festive in our Irish home tonight. The fire is lit, the kids are passing out candy, and we’ve just tucked into the most spooktacular fresh apple cake, topped with Irish whiskey caramel sauce. And, oh my goodness…this is so much better than a chocolate bar or sweet could ever be! The mixed spice and walnuts in the cake give it a gorgeous flavour…but, truth be told, I think the caramel whiskey sauce stole the show!

A jar of homemade Irish Whiskey Caramel Sauce with a bottle of Jameson Irish Whiskey behind it

Did you know Halloween originated with the ancient Celts? ‘Tis true! It is an Irish tradition predating St. Patrick by more than 300 years. It arose from the Celtic fire festival called Samhain (pronounced “sow-in”); marking the end of the harvest period and the beginning of winter.

The Celts believed that on the eve of Samhain, the veil separating the living from the dead opened briefly allowing for mischief and anarchy. Huge bonfires were lit to keep evil spirits at bay and costumes were worn to protect people from being carried off into the “other world”. The friendly spirits of loved ones were welcomed home at this time of year and nuts and apples were offered as enticement.

And it was the thought of Halloween+nuts+apples that led me to make tonight’s pudding (dessert). This fresh apple cake incorporates four apples and nearly 4oz of chopped walnuts. And while it may be too late to make it in your home this evening, print the recipe or save it for another autumn celebration {Thanksgiving is right around the corner!}: I think you’re going to love this!

Fresh Apple Cake

Makes 2 Loaves or 1 Bundt Cake

Ingredients

338g/12oz/3 cups all-purpose flour

454g/16oz/2 cups sugar

3 large eggs

350ml/12oz/1-½ cup vegetable oil

125ml/4oz/ ½ cup apple juice

1 teaspoon salt

½ teaspoon mixed spice {pumpkin spice}

1 vanilla bean, split open and seeds scraped out

102g/36oz/3/4 cup walnuts, finely chopped

4 apples, cored, peeled and finely diced

Directions

1. Preheat the oven to 170ºC/325ºF. Grease and line two 900g/2lb loaf tins with parchment paper or grease a 10-inch Bundt pan and lightly flour it too.

2. Using an electric mixer, mix the sugar, eggs, seeds of the vanilla bean, and oil until, smooth. Stir in the apple juice and mix well.

3. Sift together the flour, salt, baking soda, and mixed spice. Add the flour mixture to the sugar mixture and stir well.

4. Stir in the walnuts and apples. Pour the batter into the prepared pans.

5. Bake for 90 minutes. Remove the cake from the oven, let it cool in the pan for 5 minutes, then carefully remove it from the loaf tins/Bundt pan and allow to cool on a wire rack.


The above photos were taken while I was making the whiskey caramel sauce. It’s a very easy process that only takes minutes to make: the results are out of this world good!

Irish Whiskey Caramel Sauce

Makes 6oz

Ingredients

114g/4oz/1 cup sugar

50ml/2oz/ ¼ cup water

118ml/4oz/1/2 cup double cream {heavy whipping cream}

30g/1oz/2 tablespoons butter

¼ teaspoon salt

50ml/2oz/ ¼ cup Irish whiskey

Directions

1. Bring the sugar and water to boil in a large heavy bottom saucepan over medium-high heat. Using a wooden spoon, stir until sugar is dissolved.  Boil, without stirring, until mixture turns a golden/amber color.

2. WHILE the sugar water is cooking, into a separate saucepan add the cream, butter and salt. Cook over medium heat until the butter is melted.

3. When the sugar water has turned amber color remove the saucepan from the heat and CAREFULLY add the cream mixture to it.  The combined mixture will bubble up and the caramel will harden.

4. Return the saucepan to a low heat and simmer, stirring constantly, until the caramel is dissolved and the sauce is smooth.

5. Once combined, add the whiskey and stir well. Set aside to cool and use as desired.

Additional Notes, Related Articles & Credit:
For more information and recipes about Halloween+Ireland, please click on Quick Barm Brack, Halloween & Irish Barm Brack {this is my Barm Brac yeast bread recipe}, Halloween & the Irish offers up lots of lore, Making Candle Pumpkins is a fun craft for this time of year, so too is Halloween Marshmallow Pops, Ireland+Halloween+Apple Cake  features Darina Allen’s Apple Cake recipe+information about the famous Snap Apple Night painting by Cork-born Daniel Maclise, Haunted Ireland is where you’ll find information about haunted Irish castles and homes, and, last but not least, over at Colcannon you’ll find my recipe for this traditional Irish Halloween potato and cabbage dish.


Three candles in pumpkins with autumnal leaves

With two daughters in our Irish home, there is always a craft project in the works. And, happily, these sweet little pumpkin luminaries are a doddle to make. In fact, we a had a few odd shaped and left-over candles on hand, so I didn’t even have to buy wax for this activity. Wicks are readily available, as are tiny pumpkins…so there’s no excuse not to try making these pumpkin candles in your home. Enjoy!

Candle Pumpkins

Materials & Equipment

Small pumpkins

Wax flakes or left over candles

Wicks {if you have odd-shaped or old candles you are repurposing, you may also be able to repurpose the wicks}

Aluminium

Cutting board

Knife or store-bought serrated carver {the later worked well for us}

Spoon

Paperclip

Wooden skewer

Old pot

Tape

Instructions

1. Line your countertop or work surface with aluminum. Set out all your supplies.

2. Carefully, cut out the top of the pumpkin with your knife or store-bought serrated carver. This is the trickiest part, especially for little hands. Discard the top.

3. Hollow out the pumpkin with the spoon. Scrape out all the seeds and strings. You can save the pumpkin seeds for roasting later, if you like.

4. Tie one end of the wick to a paperclip and place in the hollowed out pumpkin. If you buy wicks with the metal ring already attached, press the base of the wick into the hollowed out pumpkin.

5. If repurposing old candles, chop them into small pieces on the cutting board…again, taking care not to cut yourself.

6. Put wax into your pot and melt over very low heat on the hob {stove}. It will be clear and totally liquid when ready.

7. Pour the wax, carefully, into the pumpkin. Only fill about half-way. Hold the wick upright as you pour.

8. Tape the top part of the wick to the skewer to hold it in place.

9. Pour the rest of the wax into the pumpkin until it is completely filled.

10. Reposition the wick, if necessary, and leave to cool for at least 6-8 hours or overnight.

11. When the candle is fully set, remove the tape and the skewer. Trim the wick to about 1/2-inch in length above the wax surface.

Additional Notes, Related Articles & Credit:

* While it is still warm, wipe clean the pot you used to melt your wax with kitchen roll {paper towels}. Do not pour hot wax down your sink and do not pour it into your kitchen bin {trash can}.

** For a warm, autumnal smell, add crushed  cinnamon sticks to the wax and stir well before pouring into the hollowed-out pumpkins.